Stucco is popular for a reason. It looks clean, it can last a long time, and it holds up well in many climates.
But stucco has a downside that catches homeowners off guard. It can fail quietly. Water can get behind the surface, spread through the wall assembly, and cause damage long before the outside looks “bad.”
This article breaks down the most common warning signs of stucco failure. You’ll learn what to look for, why it matters, and what to do next. It’s not a substitute for a professional inspection. It’s a practical guide to help you spot trouble early.
What “Stucco Failure” Really Means
Not every crack is a crisis. And not every stain means the whole system has failed.
When professionals talk about stucco failure, they usually mean one of these situations:
- Cosmetic issues: Small shrinkage cracks, minor discoloration, superficial wear.
- Moisture intrusion: Water enters the wall assembly and doesn’t dry properly.
- System failure: The wall can’t manage water. Moisture becomes persistent, damage escalates, and repairs become invasive.
The key point is this: stucco is not the waterproofing layer. Stucco is the cladding. The real protection is behind it—weather-resistive barrier (WRB), flashing, drainage details, weep screed, and proper transitions.
When those supporting pieces are missing or poorly installed, stucco often becomes a moisture trap.
Where failures typically start
Most stucco problems begin at a weak point where water can enter repeatedly:
- Window and door openings
- Roof-to-wall intersections
- Deck and balcony attachments
- Penetrations (hose bibs, vents, lights, outlets)
- Bottom edges near grade
- Transitions between materials (stucco to brick, stucco to siding)
Water doesn’t need much space. A tiny opening can be enough.
The 10 Stucco Failure Warning Signs (Red Flags You Can See)
A single red flag may not mean major failure. But patterns matter. Multiple symptoms in the same area usually point to a deeper issue. That is when stucco failures and remediation become a real conversation, not just a cosmetic concern.
For each sign below, you’ll see what it looks like, why it matters, and what to do next.
Red Flag #1: Step Cracks, Spider Cracks, or Widening Cracks
What it looks like:
Hairline cracks that branch like a web. Stair-step cracks following block lines. Diagonal cracks radiating from window corners. Cracks that keep coming back after patching.
Why it matters:
Some small cracks are normal as a home settles and materials expand and contract. The concern is active cracking—cracks that widen, multiply, or run from corners where stress concentrates. Cracks can also create entry points for water. Even “thin” cracks can allow moisture in under wind-driven rain.
What to do next:
- Photograph cracks with a coin or ruler for scale.
- Recheck in 30–60 days, especially after storms or freeze-thaw cycles.
- If cracks are widening, concentrated around openings, or appearing in clusters, schedule an inspection.
Red Flag #2: Bulging, Bowing, or “Puffy” Areas
What it looks like:
Sections that look swollen. Areas that feel hollow when tapped. A wall plane that no longer looks flat.
Why it matters:
Bulging often suggests delamination—the stucco is separating from the substrate. That separation may be caused by moisture, poor bonding, or underlying material breakdown. It’s not a “wait and see” symptom. If moisture is involved, damage tends to accelerate.
What to do next:
- Don’t press hard or try to break it open yourself.
- Note the size and location.
- Call a professional. Bulging is one of the most apparent exterior signs that the assembly may be compromised.
Red Flag #3: Staining or Discoloration
What it looks like:
Dark streaks under windows. Brown or rust-colored lines. Green algae buildup in patches. Stains that reappear after cleaning.
Why it matters:
Stains often track water flow. When water repeatedly enters at a flashing gap or window detail, it leaves a visual “map.” Algae can signal constant dampness. Rust-colored stains may indicate metal lath corrosion or flashing issues.
What to do next:
- Identify the pattern: does it start near a window corner, roofline, or penetration?
- Check gutters and downspouts for overflow.
- If stains persist, assume water is involved and investigate further.
Red Flag #4: Efflorescence (White, Chalky Deposits)
What it looks like:
A white powdery film or crust on the stucco surface, sometimes concentrated near the bottom of walls.
Why it matters:
Efflorescence forms when water moves through cement-based material, dissolves salts, and deposits them on the surface as it evaporates. Occasional efflorescence can happen in some environments. But recurring efflorescence suggests repeated moisture movement.
What to do next:
- Don’t paint over it without addressing the source. Paint can trap moisture.
- Look for nearby water sources: sprinklers hitting the wall, grade too high, or missing weep screed clearance.
- If it’s spreading or recurring, get a wall evaluation.
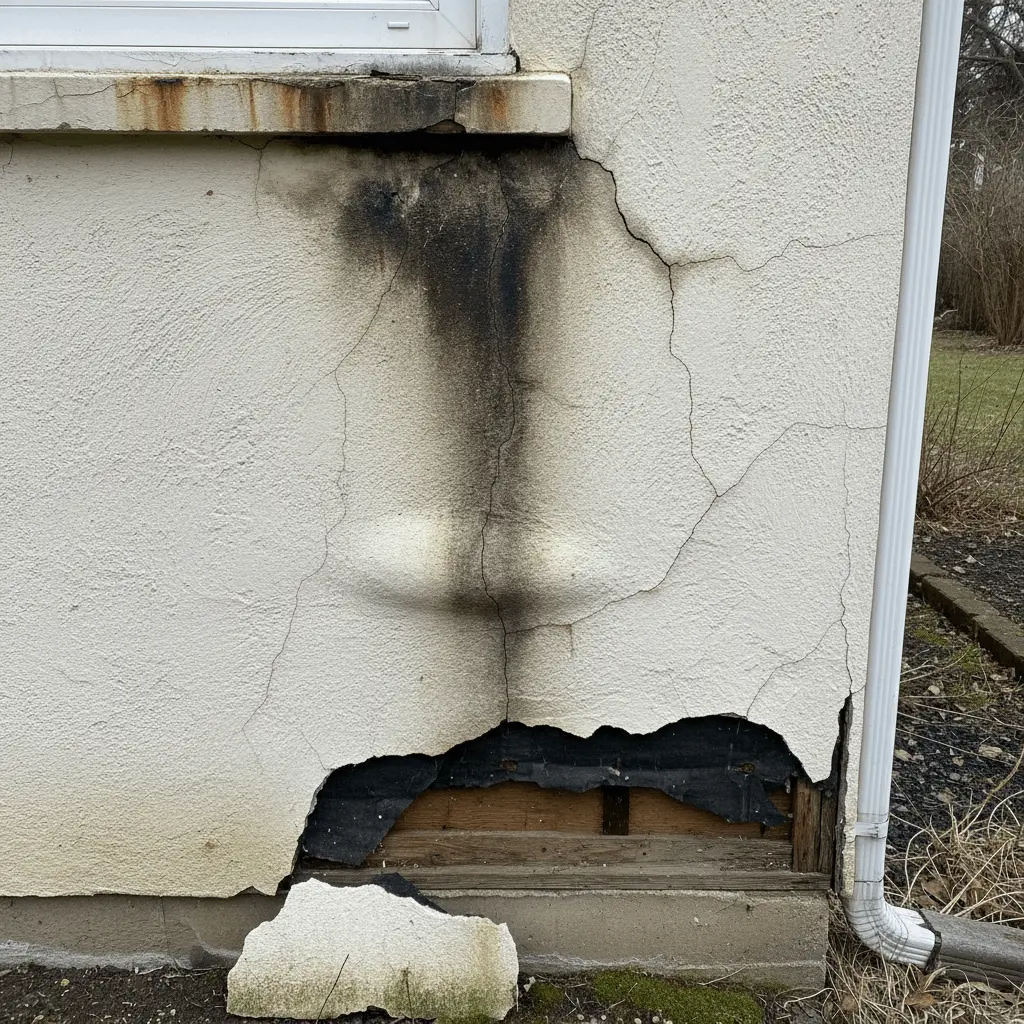
Red Flag #5: Soft or Crumbly Stucco When Pressed
What it looks like:
Stucco that feels weak or sandy, or that flakes off. Edges that crumble near the base of the wall.
Why it matters:
Surface deterioration can come from age and exposure. But soft spots can also indicate moisture trapped behind the stucco, which can break down the cement matrix or the substrate. If the wall assembly is wet, you may also have compromised sheathing or framing.
What to do next:
- Avoid “patch and forget.” Patching can hide the symptom, not solve the cause.
- Pay attention to where softness appears—near grade, under windows, below decks.
- Consider a moisture inspection to check what’s happening behind the surface.
Red Flag #6: Gaps or Cracks Around Windows and Doors
What it looks like:
Separation between stucco and window trim. Cracks at the corners. Caulk is pulling away. Gaps that open and close seasonally.
Why it matters:
Windows and doors are prime entry points. Stucco systems rely on correct flashing and integration with the WRB. When those details fail, water can slip in and run down inside the wall. This is one of the most common pathways of stucco failure.
What to do next:
- Inspect window corners closely, especially the lower corners.
- Look for recurring caulk failures.
- If gaps are significant, persistent, or paired with staining, prioritize an inspection.
Red Flag #7: Interior Clues: Peeling Paint, Bubbling Drywall, or Window Fogging
What it looks like:
Paint peeling on interior walls. Drywall bubbling or staining. Baseboards warping. Excessive condensation near specific windows.
Why it matters:
When stucco problems show up inside, the issue often isn’t minor. Moisture may have traveled through the wall cavity. That can lead to insulation damage, mold growth, wood rot, and even structural concerns.
What to do next:
- Take interior symptoms seriously, even if the exterior looks “fine.”
- Check the exterior wall area that corresponds to the interior stain.
- A professional moisture assessment is the safest next step.
Red Flag #8: Musty Smells or Visible Mold Near Exterior Walls
What it looks like:
A damp smell in a room that hugs an exterior wall. Mold in corners, behind furniture, or near baseboards. Recurring mildew even after cleaning.
Why it matters:
Musty odors can be an early warning sign. Mold growth needs moisture. If moisture is entering through the exterior cladding or trapped behind stucco, you may be dealing with a hidden leak that won’t resolve on its own.
What to do next:
- Temporarily improve airflow (don’t seal the room).
- Don’t rely on bleach as the solution.
- Investigate the moisture source. Mold is the symptom, not the cause.
Red Flag #9: Recurring Caulk Failures and Constant “Touch-Up” Needs
What it looks like:
You recaulk the same areas every year. Small patches keep cracking. Paint keeps bubbling. The wall never stays “fixed.”
Why it matters:
Repeated surface failures often point to a deeper system issue—movement, moisture, or both. Caulk is not the primary waterproofing layer of a stucco assembly. It’s a maintenance component. If caulk is doing all the work, something else is missing.
What to do next:
- Track where repairs keep happening. Patterns tell a story.
- If maintenance feels endless, stop patching unthinkingly.
- Get an inspection focused on flashing, WRB integration, and drainage.
Red Flag #10: High-Risk Construction Details
What it looks like:
This one is less about a visible defect and more about what’s going on structurally in your home.
High-risk details include:
- No kick-out flashing where a roof edge meets a wall
- Improper or missing weep screed at the bottom of the stucco
- No drainage plane (depending on system type and era)
- Decks/balconies attached through stucco without robust waterproofing
- Poor transitions between stucco and other materials
- Unsealed penetrations (fixtures, vents, exterior outlets)
Why it matters:
These details are common failure points because they manage water. Or they fail to. Even a well-finished wall can have hidden vulnerabilities if the underlying water management is weak.
What to do next:
If your home has these conditions, it doesn’t mean you’re doomed. It means you should be proactive. A targeted inspection now can prevent a larger remediation later.
Fast Self-Check: Where to Look First (10-Minute Walkaround)
You don’t need special tools to do a basic exterior scan. You need a plan.
Start here:
- Rooflines and roof-to-wall intersections
- Look for stains, missing flashing, or water trails.
- Windows and doors
- Focus on corners and caulk joints. Check for cracks and discoloration.
- Decks and balconies
- Inspect where the structure meets the wall. Look below for staining.
- Penetrations
- Hose bibs, dryer vents, lights, exterior outlets. These are classic leak sources.
- Bottom edge of stucco
- Check clearance from soil and mulch. Look for efflorescence and crumbling.
Take photos as you go. Not glamorous. Very effective.
When It’s Time to Call a Pro (Don’t Wait for Catastrophe)
Call a stucco professional or building envelope specialist if you see:
- Bulging, bowing, or large hollow-sounding sections
- Persistent stains or efflorescence that keep returning
- Multiple cracks around openings
- Interior moisture symptoms (staining, peeling, musty odors)
- Recurring “repairs” that never hold
What does a quality inspection include?
Depending on the situation and the professional, you might see:
- Visual evaluation of flashing and transitions
- Moisture meter readings (non-invasive)
- Targeted invasive probes in suspect areas
- Review of vulnerable details: roof-to-wall, windows, decks
- Thermal imaging (helpful in some conditions, not a magic wand)
A good inspector explains findings clearly. They should show you what they saw and why it matters.
What Remediation Might Involve (High-Level, No Scare Tactics)
Remediation ranges from small and localized to extensive. The scope depends on the cause and the spread of moisture.
Common remediation pathways
- Localized repair: Address a known entry point, replace damaged stucco in a limited area, correct flashing, and re-seal properly.
- Targeted removal: Remove stucco around high-risk areas (often windows, doors, rooflines), repair the substrate, and rebuild details correctly.
- Full remediation: Remove stucco over large areas, rebuild the water-management layers, repair structural damage, and re-clad.
Typical steps you might see
- Identify entry points and moisture paths.
- Remove compromised stucco and substrates.
- Repair or replace damaged sheathing/framing
- Install or correct WRB, flashing, and drainage details.
- Reapply the stucco system appropriately.
- Finish with proper sealants and transitions.
The goal is simple: fix the system, not the symptom. A pretty patch that hides a wet wall is not a win.
Prevention Tips That Actually Work
Most stucco failures are not sudden. They’re slow problems that have become ignored.
Here’s what helps:
- Maintain sealants, but don’t treat caulk as your primary defense
- Keep soil and mulch away from stucco bottom edges (clearance matters)
- Control roof runoff with functioning gutters and downspouts
- Redirect water away from the foundation (grading and drainage)
- Fix flashing issues early, especially kick-out flashing areas
- Inspect annually, and after major storms or freeze-thaw cycles
Prevention is boring. It’s also cheaper.
FAQ: Stucco Failure Warning Signs
Are hairline cracks in stucco normal?
Often, yes. Minor shrinkage cracks can occur. The concern is cracking that widens, spreads, or clusters around openings, or cracking paired with staining or soft spots.
Can stucco failure cause mold?
Yes. If moisture enters and remains trapped within the wall assembly, mold can develop in insulation, drywall, wood framing, or behind finishes.
How much does stucco remediation cost?
Costs vary widely based on scope, access, and damage. Localized repairs can be modest. System-level remediation can be significant. A proper inspection is the only honest way to estimate.
How long does stucco remediation take?
Minor repairs may take days. Larger remediation can take weeks, depending on demolition, drying time, rebuilding details, and weather.
Should I buy a home with stucco issues?
Not automatically a deal-breaker. But you should treat it as a due diligence priority. Get a qualified inspection, understand the scope, and budget based on evidence—not optimism.
Conclusion: Catch It Early, Save Yourself the Big Repair
Stucco can last for decades. It can also hide serious moisture problems. Both statements are factual.
If you notice one red flag, document it. If you saw several, don’t delay. The earlier you identify the source of moisture intrusion, the more options you have. And the less invasive the solution tends to be.
If you want the safest next step, schedule a professional stucco inspection—especially if you’re seeing bulging, repeated staining, interior symptoms, or recurring repair failures. Those are the signs homeowners most regret ignoring.